HAPPY HOLIDAYS!
- Corinna @ CardArt

- Dec 25, 2020
- 6 min read
Updated: Jan 22, 2021
Creating Christmas cards for family, friends, neighbors and seniors.

WARNING: This is going to be my very first - and probably longest blog post...
I'm just saying this so you bear with me on this.
For some people it might be easy to start a blog as a fresh new toy and not look back... but I really liked the Christmas themed cards I just made last month and so in my first post, that's going to be my topic - no specific how-to's yet, just a story and a collection of ideas.
With 2020 being such a difficult and socially distant year, I thought it would be a great idea to send Christmas cards out to almost everyone we've been in contact with over the year.
Having family, old and new friends, colleagues and neighbors listed in a yellow notebook (yes, I know - super old school) we came up to almost 35 cards plus 10 additional ones that I promised to send to a senior home through The GlamourGals Foundation (www.glamourgals.com) - I'll talk about this later.
“Mail your packages early so the post office can lose them in time for Christmas.” - Johnny Carson
I have the feeling that 45 cards is a lot - especially when you think about being stuck at home 9/12 of the year. What do you think?
Preparation is key...
...at least that's what they say. And I took that very seriously!!!
Instead of concentrating on one design and then mass-producing it (I've done that in the past), I ended up buying loads of Christmas products: dies, stamps, embossing and debossing folders, new releases and products on sale - as if my life depended on it.
What I got was a headache, because all of a sudden there were so many choices and ideas in my head that I didn't even know where and how to start.
I ended up bundling products and writing down ideas for those bundles (yup... all in the yellow note book again) - and ended up making 3-5 cards per design.
So let's show you some ideas:


For the first cards I used the "Peace on Earth" stamp and die set from ALTENEW. I think this was the first holiday set I ever bought. And I love it! It seemed perfect for cards to send across the pond - especially with the globe ornament and the international wishes. In the cards above I used those wishes to create the background of the cards. I stamped the ornament and cut it out to "hang" it from the top of the card. Also the main greeting I added heat embossed on vellum paper.


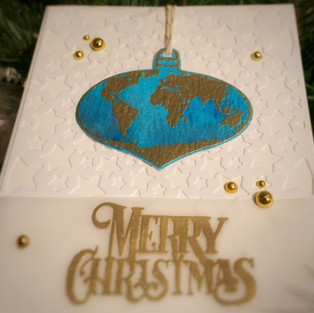


The second set of cards I created with the "Peace on Earth" ornament, got inspired by Tasnim Ahmed's card - found on the ALTENEW product page (https://altenew.com/products/peace-on-earth-stamp-die-bundle). I loved the festive look of the blue ocean and the golden embossing powder, so I tried out the Nuvo Shimmer Powder "Blue Blitz" for the first time with a good amount of water for the ocean. As for the card background in general, I decided to use the "Radial Stars Cover Die" by ALTENEW with a really heavy card stock to get some three-dimensional feeling. I wanted to add some more festivity to the card and decided on more gold embossing for the Christmas greetings - I used the Gina K. "Holiday Tapestry" on vellum with the same golden Ranger Embossing powder and some Studio Katia "Gold Foil Pearls" for the finishing touch.


When I saw Jennifer McGuire use the Spellbinders November Club Kit, I knew that I needed this!
So... I signed up for the "Large Die of the Month" Kit and crossed my fingers that I wasn't too late for those artsy dies to arrive. I waited for some time (probably also due to delivery in the times of COVID), but the wait was totally worth it. The stitching just turns out really nice - no matter if you're experienced or not - you can simply NOT mess it up!


What's cool about this set is, that you can either cut out the tree and star and use them as stand-alone dies on your card or even as ornaments. Or you just use the "inner" dies (don't know how else to call them) to cut out the pattern that you need for the stitching.
Besides the stitching, I used more Gina K. "Holiday Tapestry" and "Handlettered Holiday" Stamps as well as the ALTENEW "Halftone Holidays" stamp set and the "Happy Holiday Script Die Set" for the greetings.


The Birch Press Design "Viola Plate Layer Set" holds a special place in my heart. I just love to use this set in so many ways and it makes so much sense for Holiday cards because of the flowery design (looks a bit like a Poinsettia... doesn't it?). As you can see in the cards above, I used it in two different ways lately. for the Holiday colors card, I stacked all three layers of the set and kept the design very clean with a simple Holiday greeting and sentiment plus some red/green/white pearls as embellishments.
For the second card I used the Layer A only (I simply cut off a 1/3 section on the top to get more of a lacy look) over some lightly inked heavy card stock - here I used the Amethyst and Pale Mauve ink from ALTENEW's "Sugarplums Crisp Dye Ink" Set. To add a little Glam & Glitz, I decided on coloring heavy card stock with ALTENEW's Metallic Watercolors and die-cutting the ALTENEW "Happy Holiday Script Die Set" for the greetings (also added three layers of white underneath to get some 3D effect) as well as the "from our home to yours" from the "Halftone Holidays" stamp set.
To finish it up, I added some burgundy pearls from a no-name embellishment set that I got on Amazon.


Super early in the Christmas game - I think it was June or July ;-) - I fell for the Tim Holtz Holiday releases. In particular the "Stunning Snowflake" and 3-D embossing folder "Poinsettia" got me hooked. They are so versatile, impressive to look at and easy to handle!
I combined them in so many ways with silver / gold / shimmery / letterpressed and embossed backgrounds, die-cut poinsettia flowers, big holiday wishes, effective embellishments... these were just so much fun!


Last but not least I also needed something less glitzy - or let's say "more masculine". I decided to give layering stencils a try. Not only is the price point amazing, but also the effects you get and the ways you can use them are sheer endless! I am sure that I'll play and write a little more about stencils in the future.
To come back to these cards, I used the ALTENEW "Classic Pine" set - two stencils that also come in a bundle. For the ink I used the Ranger Distressed Oxide Inks by Tim Holtz - colors "Rustic Wilderness" and "Vintage Photo". I just love the colors and the texture - so these Distress Oxides are usually my go-to's when it comes to ink blending. For the greeting I used the Gina K. "Holiday Tapestry" stamps again as well as the "Tag Trio Die Set" from Gina's "Sparkle & Shine" Card Kit.
To be honest, it took me a while and long hours to get those cards done, but I enjoyed trying out new products, brands that I haven't used before and the feedback I received from family and friends was absolutely worth every minute of work!
I mentioned the The GlamourGals Foundation (www.glamourgals.com) earlier in the post and this is something that I'd like to write a bit more about.
The first time I heard about this non-profit was through my boyfriends employer (global law firm with headquarters here in Boston) and JB thought I might wanted to get involved... he just knows me :-)
For over 20 years GlamourGals Foundation, Inc. has been inspiring companionship and conversation through complimentary beauty makeovers given by teen volunteers to residents living in senior homes. But with the current situation and kids not being able to visit, GlamourGals came up with the #MyDearFriend - idea: Have people write notes to isolated seniors across the country. It's the easiest thing to participate: you go to their website, pledge to send notes (you can decide how many), receive the address of a senior home vie e-mail, make the cards and send them out via the postal service!
It's super simple and the outcome is HUGE: The seniors receive love through cards which alone just melts my heart - thinking that I can make someone's day... but also with every card sent GG's sponsors donate $1. And that money pays for resources, tools, training and organization so that high school and college volunteers can become compassionate, community-oriented leaders through intergenerational service.
I made 10 cards for Christmas and already pledged to make 16 for Valentine's Day... post will follow.
Thank you for reading and making it to the end of my first blog post!
That was really along one - I promise that the next ones will be shorter.
Make sure to like and comment and let me know if you have any questions :-)
Love,

Comments