Happy New Year!
- Corinna @ CardArt

- Jan 15, 2021
- 4 min read
Having fun with the January My Monthly Hero Kit!

Hello everyone and welcome to my blog!
To start off the new year, I decided to play with the first kit that arrived this month - the "My Monthly Hero Kit" for January.
I had my eye on those kits for a while and because I liked what I saw in quality, design and value, I decided to subscribe to the "My Monthly Hero Kit" last month - it's a six month subscription for now...
For the Beekeepers among you
“Where there are bees there are flowers, and wherever there are flowers there is new life and hope." - Christy Lefteri
If you haven't figured it out yet, the kit celebrates the most important creature on the planet - the little bee!
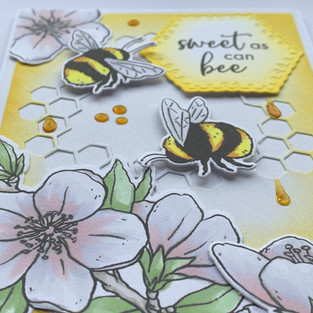
As you can see in the picture above, the Kit includes an absolutely cute stamp set (bees, flowers, honeycombs and sentiments), the coordinating dies including a honeycomb window die, six sheets of paper (6 5.5" x 8.5") and a honey lacquer pen.
During the past year I watched many videos, studied techniques and checked people's posts on Instagram or Pinterest for inspiration. My mantra for 2021 is "do it first!" - which means I really want to concentrate on my creativity and see if the creations that I come up with, can somehow measure up to what other card makers do.
So this is exactly what I tried with the bees: I used ALTENEW's "Obsidian" pigment ink to stamp the bees, flowers and greetings onto a heavy card stock and colored them.
For the mauve page I used Copic markers and with the blue version I tried out a new watercolor travel set that I recently got on Amazon. Both combined probably took me 15 minutes to color - for the water-colored image I even went a little messy on purpose just to try out and have fun.


Preparing for the cards, I cut the card stock that came with the kit to card size (A2) and die-cut the honeycomb window in each color.
To be honest - at that point I didn't even know how many cards I'd make and what they would look like. I just wanted as much product and color as possible!
Also, to add to the main product from the Kit, I went through all kinds of paper, dies and stamps that I already had and took out some bright yellow paper that reminded me of bees and sunshine, as well as older honeycomb dies (I probably got them at Michael's or Hobby Lobby some time last year?) and alphabet dies from Birch Press Design.
On one honeycomb window that I cut from white card stock, I decided to ink-blend the edges with the ALTENEW Crisp Dye Ink in "Maple Yellow" (that's from the "Sunflower Field" mini cubes set) to make it fit the yellow paper.
With all of the preparation done, I then laid out all the basics and played around with the colors and flowers and bees.
And really, the preparation is what took the longest in this case. I do love to be prepared and I love to have each element perfectly made and colored and cut before I continue.


What comes next is probably the work I enjoy the most:
Deciding how to arrange each element, using double-sided adhesive foam to give it dimension and seeing how all of a sudden there's a card in front of you that just needs as little extra sparkle to be done.
Talking about embellishments: I was absolutely amazed by how real the "honey lacquer" looks!
I dropped it on a piece of plastic to see what would come out of the little tube and when it dried, it looked like drops of honey. Delicious!
For the "Mauve flower sweet-as-can-bee" - card, I decided to have the honey drip from the honeycombs as well as have a couple of drops here and there.


I knew that the "Black glitter you're-bee-utiful" - card in contrast had to be a bit more simple - so I used the black and gold cut-outs to set some elegant accents and arrange three bees instead of bees and flowers combined.
I have to admit: one thing that I was missing in the MMH Kit was a sentiment saying "bee mine"... so I simply decided to build it myself. And as mentioned above, I used the Birch Press Design "Mod Alpha Dies" for that - I love that they look just as chubby as the bees :-)
I decided to give it a little color and also used the "Maple Yellow" from ALTENEW for that soft ink-blending. As for the finishing touches I used some "Pocketful of Sunshine" Enamel Dots (also by ALTENEW).


For the "Turquoise sweet-as-can-bee" - card I did two things a little bit different: First, I die cut the honeycomb window a little off center, which has it drift off to the right, but would give me more space for the flowers on the left. And second, I cut the sentiment in a heart shape, punched a heart shaped tiny hole and used Metallic Thread (set by ALTENEW) to hang it from the honeycomb.
To fix the heart, I simply stuck it behind the flower in the corner.
As for embellishments, i decided on the golden cut-outs again, as well as more honey drops.
Thank you for reading and I really hope you like my four bee - cards!
Make sure to like and comment and let me know if you have any questions :-)
Love,

Comments